Comparison of Flash vs. HTML5 video CPU usage
February 28th, 2010
I’d like to recommend this very interesting comparison article on Flash vs. HTML5 video CPU usage.
Flash Player: CPU Hog or Hot Tamale? It Depends.
Windows test results - check article for more - good reading

(Source: StreamingLearningCenter.com)
Invitation to E-seminar
P2P Programming in Flash Player 10.1
February 26th, 2010
 Join me for an online e-seminar on P2P Programming in Flash. I will be covering the basics of P2P in Flash, new P2P features in Flash Player 10.1, Adobe Stratus, P2P bits of LCCS, Multicast, RTMFP Groups and future possibilities.
Free registration here (+ add event to your calendar)
Date: Wednesday, March 03, 2010
Time:
- 7:00 AM - 8:00 AM (San Francisco)
- 10:00 AM - 11:00 AM (New York)
- 3:00 PM - 4:00 PM (London)
- 4:00 PM - 5:00 PM (Prague, Paris, Barcelona)
- 7:00 PM - 8:00 PM (Abu Dhabi)
- 11:00 PM - 12:00 PM (Singapore)
Prerequisites for a successful seminar:
- Flash Builder 4 Beta 2
- Flash Player 10.1 Beta 3 debug version installed
- Flex 4 Framework
Meeting will be at this Connect room:Â http://my.adobe.acrobat.com/p2p-in-flash.
Adobe Acrobat Connect Pro Goes Mobile
February 25th, 2010
Adobe® Acrobat® Connect® Pro™ is a web-conferencing tool and it’s one of the best examples of a realtime collaboration RIA app on the internet.
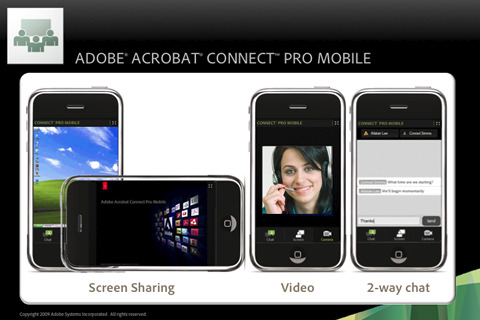
What if you don’t have a PC with you and still want to attend an online meeting. One of the features Connect Pro has is to connect people on a telephone via VOIP bridge so they can hear and participate by voice. But there are situations, when you want to fully attend the meeting via mobile.
Today Adobe introduced Adobe Connect Pro Mobile for iPhone, which you can download for free from iTunes. You can see the shared desktop (slides, pictures…), watch the live camera and chat. All simplified to fit the screen and usability on the iPhone.
Connect Pro is a nice example of a Contextual App - the app running the same context with adjusted user experience to fit the best on different devices.
All written in ActionScript 3.0
What’s even better is that Connect Pro and Connect Pro Mobile are both written completely in Flash/ActionScript 3.0. iPhone version is standalone app compiled to native bytecode using Adobe Packager for iPhone (available later this year). At Mobile World Congress 2010 we have announced AIR 2.0 for Mobile Devices and previewed Connect Pro Mobile running on Android (Motorola Droid). Which is simply the same code written and compiled in the next generation of Flash Pro to Android and iPhone. Android version was just a preview but it’s supposed to be available in the future for download as well. Together with this - AIR 2.0 is planned to be available in the second half of 2010. Basically you’ll be able to build your apps in Flash Pro by writing one base code and simplify porting to different devices.
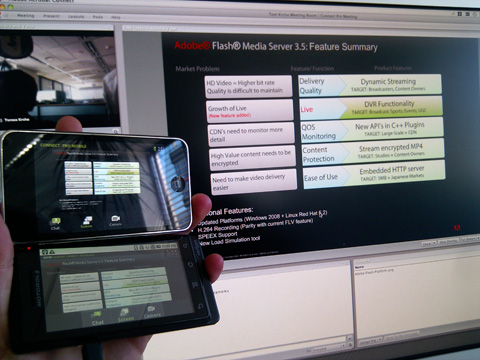
Connect Pro running on Mac in browser, iPhone and Motorola Droid.
Video: iPhone apps built with Flash - showing Connect Pro Mobile
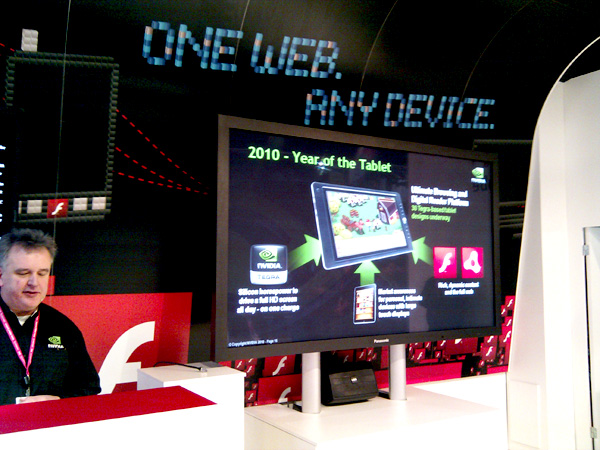
Flash Gaming on NVIDIA Tablets
February 17th, 2010
Hello from Mobile World Congress 2010 in Barcelona. Tablet - the word you can hear all around. NVIDIA is actually showing many different kinds of tablets running Flash Player 10.1 as well as AIR. They are running on ARM-based NVIDIA Tegra GPUs and can also play HD video in Flash very smooth. The Flash Player itself is accelerated by this specific hardware. Adobe cooperates closely with NVIDIA (OpenScreenProject partner) on close integration.
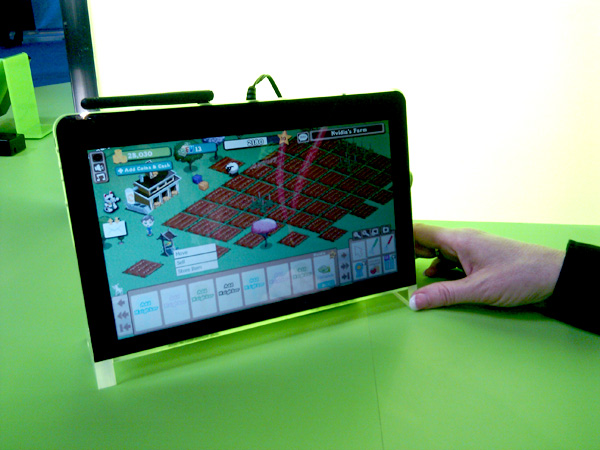
Farmville (popular Facebook game in Flash) running on the tablet
So why don’t you just take a ride with one these Flash Gaming Engines and push the limits of web gaming today.
You can also watch MAX 2009 session GPU acceleration in the new Flash Player.
Simple chat with P2P NetGroup in FP 10.1
February 9th, 2010
Watch videotutorial of creating P2P Chat with NetGroup in FP 10.1
 This tutorial explains total basics of using P2P/RTMFP Groups in Flash Player 10.1. We are going to build simple multi-user chat using RTMFP Posting - all data will be transferred over P2P! For this purpose we use recently updated (22 Jan 2010) Adobe Cirrus - rendezvous service.
Updated: 4:37 PM Feb 9 2010
Final demo: Try (run in few browsers) | Download source
Prerequsities:
- Flash Player 10.1
- UDP enabled network (you can’t be behind firewall, which blocks UDP)
- Flash Builder 4
- Cirrus developer key - Get one here if don’t have already. You have to login using your Adobe credentials to get it.
- playerglobal.swc for Flash Player 10.1
Step 1: Create new Flex 4 project
File -> New -> Flex Project
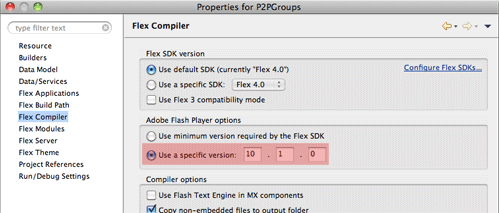
Link new playerglobal.swc (FP10.1 API) to your project in Project Properties and set compiler version in Flex Compiler to 10.1.0
Step 2: Connect to Cirrus
First of all we need to setup NetConnection to Adobe Cirrus. That’s easy part.
private const SERVER:String = "rtmfp://p2p.rtmfp.net/";
private const DEVKEY:String = "YOUR-DEVELOPER-KEY";
private var nc:NetConnection;

private function connect():void{
	nc = new NetConnection();
	nc.addEventListener(NetStatusEvent.NET_STATUS,netStatus);
	nc.connect(SERVER+DEVKEY);
}
Step 3: Setup NetGroup
We need to setup P2P group and connect to it. GroupSpecifier is a class, which let’s you to define all the parameters of the group. First you give it a name - in this case “myGroup/g1″. Then you set it to use serverChannel, to let it communicate with Cirrus. Finally we enable Posting. That’s all you have to do to define the P2P Group.
Then we have to define the actual NetGroup. groupspecWithAuthorizations() returns String - it’s a group identifier. Now you probably ask, what’s the difference between groupspecWithoutAuthorizations() and groupspecWithAuthorizations(). If you set a posting or multicast password, the one “with” can post or multicast, the one “without” is receive-only.
private function setupGroup():void{
	var groupspec:GroupSpecifier = new GroupSpecifier("myGroup/g1");
	groupspec.serverChannelEnabled = true;
	groupspec.postingEnabled = true;

	netGroup = new NetGroup(nc,groupspec.groupspecWithAuthorizations());
	netGroup.addEventListener(NetStatusEvent.NET_STATUS,netStatus);


	user = "user"+Math.round(Math.random()*10000);
}
Step 4: Handle NetStatusEvent
We are going to handle at this step just three events. When we connect to Cirrus we setup a group. When we connect to NetGroup we reflect it to UI and and when we receive a Posting message we show it in chat history.
private function netStatus(event:NetStatusEvent):void{
	trace(event.info.code);

	switch(event.info.code){
		case "NetConnection.Connect.Success":
			setupGroup();
			break;

		case "NetGroup.Connect.Success":
			connected = true;

			break;

		case "NetGroup.Posting.Notify":
			receiveMessage(event.info.message);
			break;
	}
}
Step 5: Sending and receiving message
We have to put together a message object, which handles text, user name, sender ID. Sender ID is useful to have for direct posting. And we also convert NetConnection PeerID to GroupAddress - participant address in the group. When we post() message to a NetGroup, we just distribute it/broadcast it, but it does not come back to us. So that’s why we need to call receiveMessage as well - to display it in history text field.
private var seq:int = 0;
private function sendMessage():void{
	var message:Object = new Object();
	message.sender = netGroup.convertPeerIDToGroupAddress(nc.nearID);
	message.user = txtUser.text;
	message.text = txtMessage.text;
	message.sequence = seq++; // *to keep unique


	netGroup.post(message);
	receiveMessage(message);

	txtMessage.text = "";
}

private function receiveMessage(message:Object):void{
	write(message.user+": "+message.text);
}

private function write(txt:String):void{
	txtHistory.text += txt+"\n";
}
*Sequence: Very important thing - every different message must be unique, you can’t send same message twice. P2P rerouting mechanism will think it has already delivered that message - that’s why we are adding a sequence number - can be also random.
Step 6: Create UI
<s:TextArea left="10" right="10" top="10" bottom="40" id="txtHistory"/>
<s:TextInput x="10" id="txtUser" text="{user}" bottom="10"/>
<s:TextInput left="145" right="88" id="txtMessage" bottom="10" enter="sendMessage()"/>
<s:Button label="Send" click="sendMessage()" enabled="{connected}" bottom="10" right="10"/>
Step 7: Run it
